
Your steel building is the shop where you build your business. It’s the barn that shelters your animals. It’s the garage that holds your weekends.
And you’re trusting it to stand through the worst weather of the year.
So here’s a question worth asking. How do you verify your steel building has every brace on the engineered print?
Most people can’t read an engineered print. That’s normal. But no one wants to find out during a windstorm that a brace was left out.
The good news is you don’t need an engineering degree. You need a simple, repeatable way to check each brace against the print. This guide shows you how to do it before, during, and after your building goes up.
At Metal Pro Building, we believe you should never have to take our word for it. That’s why we make the print checkable.
The Short Answer: How Do You Verify Every Brace on Your Steel Building?
To verify every brace, compare the bracing callouts on your engineered print to the bill of materials and packing list. Check the location, type, size, and quantity of each brace. Then confirm each one in person. Do this once when materials arrive, and again after each brace is installed.
Here are the five headline steps:
- Gather your documents. Collect the engineered drawings, bill of materials, packing list, and any approved revisions.
- Learn the bracing callouts. Find the legend, bay locations, and bracing schedule on the print.
- Build a brace-by-brace checklist. List the location, type, size, quantity, and hardware for every brace.
- Check deliveries against the packing list. Count each piece and match the labels and member marks.
- Verify placement during erection and at final walk-through. Confirm each brace sits in the right bay with the right hardware, then photograph it.
We’ll walk through each step in detail later in this guide.
Why Every Single Brace Matters
Think about what’s inside your building. Equipment. Inventory. Animals. Years of hard work.
It isn’t just steel. It’s everything you’ve built, sitting under one roof.
Bracing is what keeps that roof overhead when the weather turns ugly. Let’s look at why each brace counts.
What Bracing Does
Bracing is the skeleton’s backup system. It does three big jobs:
- Resists wind and seismic forces. Braces push back when wind shoves the walls or the ground shakes.
- Keeps the frame square. Without braces, a building can lean like a stack of books.
- Carries load to the foundation. Braces move force down through the frame and into the ground.
Each brace has a spot on the print for a reason. Engineers place them where the forces are strongest.
What Happens When a Brace Is Missing, Undersized, or in the Wrong Bay
A building with a weak or misplaced brace may look fine on day one. The trouble shows up under stress. Here’s what can happen:
- Racking. The frame twists out of square, and doors and panels stop lining up.
- Sway. The building moves more than it should in wind.
- Stress at connections. Bolts and joints take loads they weren’t designed to carry.
- Failure under snow or wind load. In the worst case, part of the structure gives way.
A brace in the wrong bay is a real problem, too. It may be the right part, but it isn’t doing its job where the engineer needed it.
The Hidden Costs of Getting It Wrong
Even if the building never fails, missing bracing costs you. Here are some of the ways:
- Failed inspections. Inspectors compare the building to the approved plans.
- Permit delays. A failed check can stall your project for weeks.
- Voided warranties. Changes made without approval can put your coverage at risk.
- Insurance headaches. A claim can get complicated if the building doesn’t match its engineering.
- Expensive corrections. Fixing a brace after the roof is on costs far more than catching it early.
Bracing is the part of the building nobody sees when everything goes right. It’s also the only part everyone remembers when something goes wrong.
Understanding the Types of Steel Building Bracing
Not every building uses the same bracing. The type and layout depend on the engineering for your building’s size, location, and load requirements. A small garage in a calm area needs a different setup than a large shop in a high-wind zone.
Still, most steel buildings use a mix of the types below. Knowing them helps you spot each one on your print.
X-Bracing (Cable or Rod) in Walls and Roofs
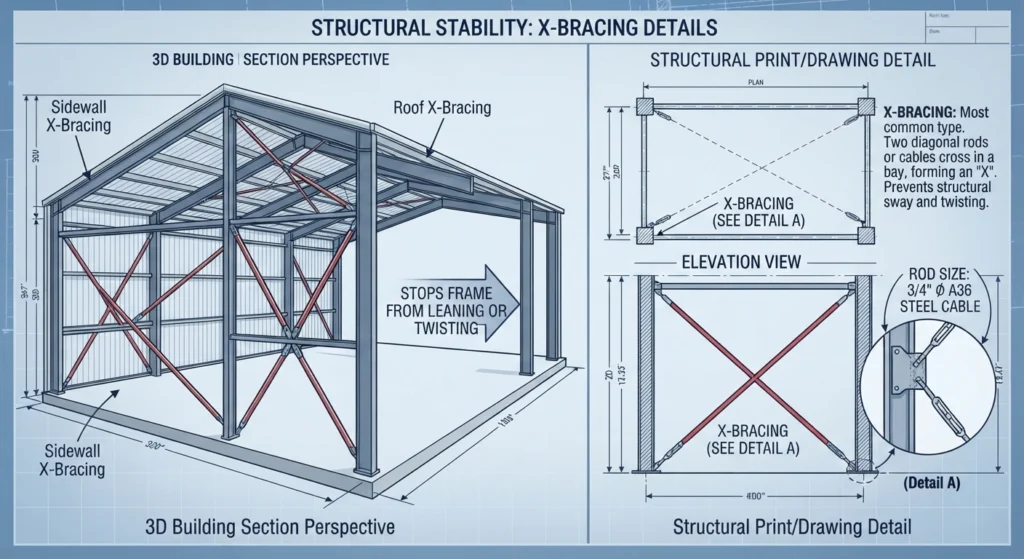
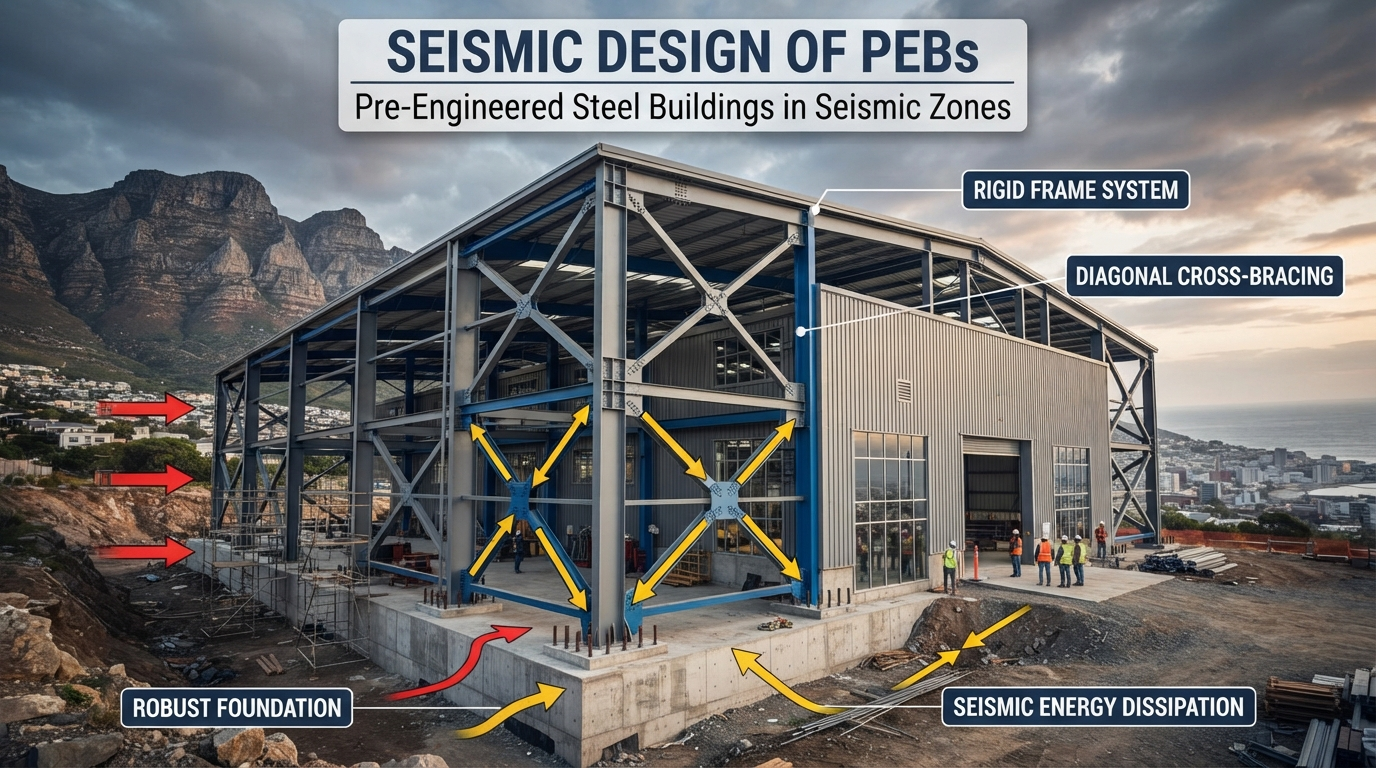
X-bracing is the most common type. Two diagonal rods or cables cross in a bay, forming an X.
You’ll see it in sidewalls and in the roof. It stops the frame from leaning or twisting.
On the print, look for crossed diagonal lines inside a bay. A label usually gives the rod or cable size.
Portal Frame Bracing and Knee Braces
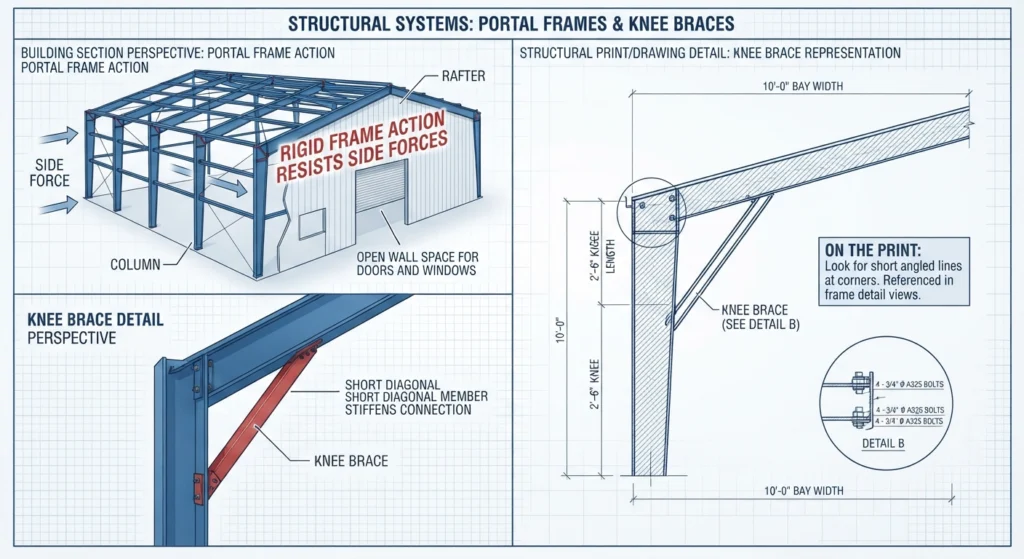
Portal frames use a rigid frame to resist side forces. This is helpful when you need open wall space for doors.
Knee braces are short diagonal members in the corners where columns meet rafters. They stiffen the connection.
On the print, look for short angled lines at those corners. They are often noted in the frame detail views.
Flange Braces and Purlin/Girt Bracing
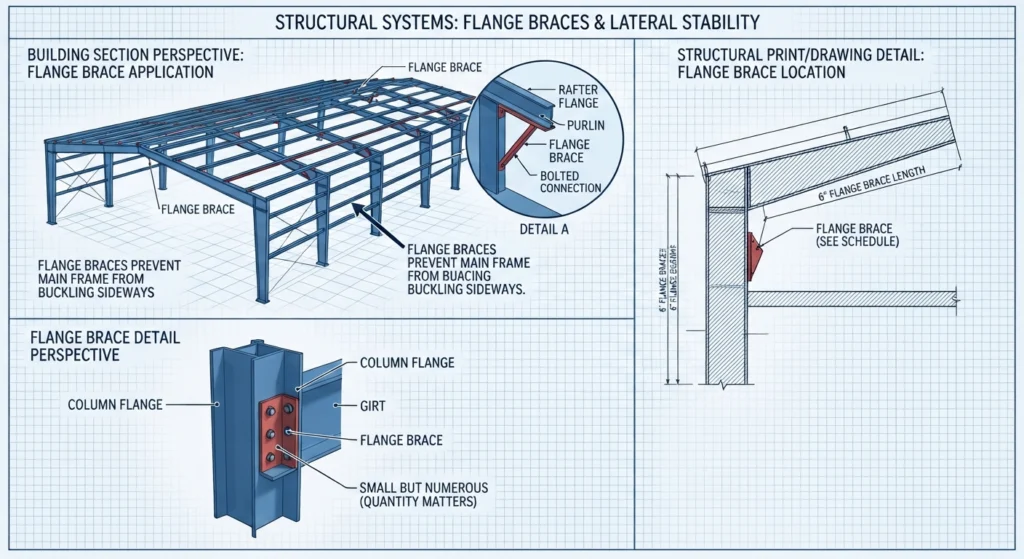
Flange braces are small angle pieces. They connect a column or rafter flange to a purlin or girt.
They keep the main frame from buckling sideways. They are easy to miss because they’re small, but there are often many of them.
On the print, check the framing details and the bracing schedule. Quantities matter here.
Diagonal and Sidewall Bracing at Endwalls
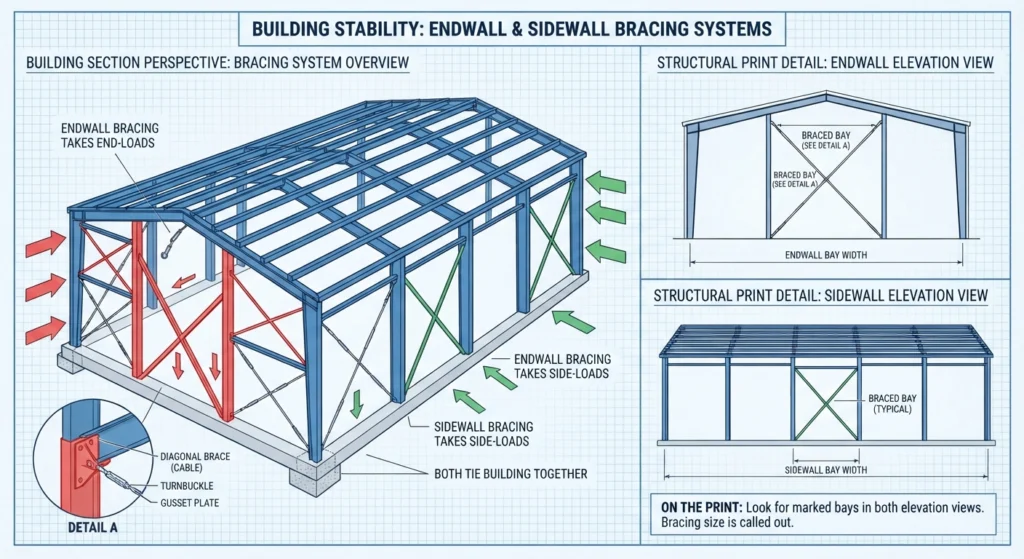
Endwalls take a lot of wind pressure. Diagonal braces there help carry that load to the foundation.
Sidewall bracing works the same way along the long walls. Both tie the building together as one unit.
On the print, check the endwall and sidewall elevation views. Each braced bay is marked.
Bracing Types at a Glance
| Bracing Type | Where It’s Used | What It Does | How It Appears on the Print |
| X-bracing (rod or cable) | Sidewalls, endwalls, and roof bays | Resists wind and keeps the frame square | Crossed diagonal lines in a bay, with a size callout |
| Portal frame bracing | Walls that need open space, such as door bays | Resists side forces without diagonal rods | Rigid frame shown in the frame cross-section |
| Knee braces | Corners where columns meet rafters | Stiffens the connection | Short angled lines at corners in frame details |
| Flange braces | Between frame flanges and purlins or girts | Prevents sideways buckling | Small angle symbols in framing details and the bracing schedule |
| Diagonal bracing at endwalls | Endwalls and sidewalls | Carries wind load down to the foundation | Diagonal lines in the elevation views, with braced bays marked |
A quick note: Symbols vary by manufacturer. Always check the legend on your own print first.
Step-by-Step: How to Verify Every Brace Against Your Engineered Print
You don’t need to be an engineer to do this. You need patience, a printed copy of your drawings, and a pen.
Work through the six steps in order. Each one builds on the last.
Step 1: Gather Your Documents
Start by collecting everything in one place. You’ll need:
- Engineered or erection drawings. These show where every brace goes.
- Anchor bolt plan. It shows where the building meets the foundation.
- Bill of materials. This lists every part in your order.
- Packing list. This lists what was actually shipped.
- Approved revisions. Any changes to the original print should be in writing.
Check the revision number on each page. Make sure every document matches. An old print can send you hunting for braces that were never changed or removed.
Step 2: Learn to Read the Bracing Callouts and Symbols
Next, find the legend on your print. It explains the symbols the drawing uses.
Then look for these four things:
- Legend. It shows what each line and label means.
- Bay locations. Bays are the spaces between main frames. They’re usually labeled with letters or numbers.
- Member marks. These are short codes that name each part, like “XB-1.”
- Bracing schedule. This is a table listing each brace type, size, and quantity.
Don’t worry if it feels like a new language. After a few minutes, the patterns start to repeat.
Step 3: Build a Brace-by-Brace Checklist
Now turn the print into a plain checklist. Go bay by bay and wall by wall. For every brace, write down:
- Location. Which wall, roof section, or bay?
- Type. X-brace, knee brace, flange brace, or other?
- Size. What rod, cable, or angle size does the print call for?
- Quantity. How many of this brace are there in total?
- Connection hardware. Which bolts, clips, or turnbuckles go with it?
Here’s a simple format you can copy:
| Brace Mark | Location | Type | Size | Qty | Hardware | Delivered ✔ | Installed ✔ | Photo ✔ |
| XB-1 | Left sidewall, Bay B | X-brace (rod) | 3/4″ | 2 | Turnbuckle, clips | ☐ | ☐ | ☐ |
Add one row for every brace. It takes time. It also catches problems that nothing else will.
Step 4: Check the Delivered Components Against the Packing List
When your delivery arrives, don’t just sign for it. Take an hour and check it first. Do this:
- Count each piece. Match the number to the packing list and your checklist.
- Read the labels. Each brace should carry a member mark that matches the print.
- Check the hardware bags. Make sure bolts and turnbuckles are the right size and quantity.
- Note any damage. Bent rods or cracked clips should be written on the delivery receipt.
Anything missing or wrong should be reported right away. It’s much easier to fix before the crew is on site.
Step 5: Verify Placement During Erection
This is where the print becomes a real building. Check braces as they go in, not after the walls are covered.
For each bay, confirm these points:
- Right bay, right wall. Compare the spot to your checklist.
- Correct orientation. Braces should face the way the print shows.
- Correct bolts and connections. No substitutes, and no missing bolts.
- Proper tension. Rod and cable braces should be snug. They shouldn’t be slack or cranked too tight.
Check in with your erector each day. Ask them to point to the brace on the print before they install it. A good crew won’t mind.
Step 6: Do a Final Walk-Through Before Sign-Off
Before you approve the work, walk the whole building with your checklist. Look at:
- Roof. Check roof bracing from inside, looking up along the rafters.
- Sidewalls. Confirm every braced bay on both sides.
- Endwalls. Check the diagonal bracing and its connections.
Tick off each row on your checklist. Take a photo of every brace, with the member mark visible if you can. Save the photos in a folder with your print.
If anything doesn’t match, don’t sign off yet. We’ll cover what to do in a later section.
Tip: Mark off each brace on a printed copy of the print as you go. Then photograph the marked-up page. You’ll have a simple record if an inspector, insurer, or future buyer ever asks.
Common Mistakes and Red Flags to Watch For
Even careful projects hit snags. Most bracing problems are small and easy to spot, if you know where to look.
Here are the red flags to watch for.
Bracing Installed in the Wrong Bay or on the Wrong Wall
This is the most common mistake. The part is right, but the location is wrong.
It happens when a crew works from memory or an old print. Check every braced bay against your checklist, not just the first few.
Substituted or Field-Modified Members With No Engineer Approval
Sometimes a crew runs short and swaps in a different size. Or they cut a member to make it fit.
Don’t let that slide. Any change to a structural member needs approval from the engineer of record. If it isn’t in writing, it isn’t approved.
Rod or Cable Braces Left Loose or Over-Tightened
A slack brace does nothing when wind hits. An over-tightened one can pull the frame out of square.
Rod and cable braces should be snug and even. If one looks saggy or bowstring tight, flag it.
Missing Hardware or Mismatched Bolts
A brace is only as strong as its connection. Look for empty bolt holes, missing nuts, and bolts that look too small.
Compare the hardware to the hardware bags and your checklist. Mismatched bolts often mean a part was swapped.
Prints That Are Outdated, Unsigned, or Missing Revision Numbers
A print without a revision number is a print you can’t trust. So is one that isn’t signed or stamped where your area requires it.
Make sure every page carries the same revision. If you aren’t sure you have the latest version, ask your supplier before work begins.
Vague Answers From the Supplier or Erector
Try this simple test. Ask where a specific brace goes, and see how they answer.
A clear answer points to the print and names the bay. A vague answer, like “we’ll figure it out on site,” is a warning sign.
A good supplier welcomes your questions about the print. If someone gets defensive when you ask, that tells you something.
What To Do If a Brace Is Missing or Doesn’t Match the Print
Finding a problem is stressful. Take a breath.
This is fixable, and it is far easier to fix before the roof is on. Here’s how to handle it.
Stop and Document
First, pause the work in that area. Don’t let the crew keep building around the problem.
Then gather the facts:
- Photos. Take wide shots and close-ups of the area.
- Member marks. Capture any labels on the parts in question.
- The print page. Photograph or copy the page and circle the brace in question.
- Your checklist. Note which row doesn’t match.
Good records make the next steps faster. They also protect you if there’s a dispute later.
Contact Your Supplier Right Away
Call or email your supplier as soon as you’ve documented the issue. Don’t wait until the end of the day, or the end of the week.
Give them clear details:
- Your order or project number
- The print page and revision number
- The brace location and member mark
- What the print says versus what you found
- Your photos
Put it in writing, even if you also call. An email creates a record.
Don’t Improvise or Substitute
It’s tempting to say, “Close enough,” or “We’ll just use what we have.” Don’t.
Any change to a structural member must come from the engineer of record. A part that looks similar may not carry the same load. Guessing could put your building, and your warranty, at risk.
Request Written Confirmation or a Revised Print
Before the work continues, ask your supplier for one of two things:
- Written confirmation that the part is correct and the print is being followed, or
- A revised, engineer-approved print that reflects the change.
Make sure the new document carries a revision number and date. Add it to your folder, and update your checklist to match.
When to Bring in a Third-Party Inspector
Sometimes you want a second set of eyes. Consider hiring an independent inspector or engineer if:
- The supplier’s answers are unclear or slow
- You and the supplier disagree about what the print requires
- The building is large, high-value, or in a high-wind or heavy-snow area
- Work has already moved past the point where you can check it yourself
- A lender, insurer, or building department requires it
An inspector’s fee is small compared to the cost of fixing a problem later.
What It Looks Like When Your Building Supplier Makes This Easy
Everything in this guide gets easier when your supplier is on your side. A good process doesn’t leave you guessing.
At Metal Pro Building, we built our process around that idea. Here’s what you can expect when you work with us.
Engineered, Permit-Ready Drawings That Spell Out Every Brace
Your print should show each brace clearly. Our drawings include labeled bays, a readable legend, and a bracing schedule with sizes and quantities.
They also carry revision numbers and the engineering approval your area requires. You shouldn’t have to decode them alone.
Labeled Components and Itemized Packing Lists
Every brace we ship carries a member mark that matches your print. Hardware comes bagged and labeled.
Our packing list matches the bill of materials, line by line. When the paperwork agrees, checking goes fast.
A Real Person Who Walks You Through the Print
Before delivery, you can talk to an actual person on our team. Not a call center. Not a chatbot.
We’ll point to a bay on your print and explain what goes there. Please ask us to. We’d rather you understand it now than wonder later.
Help With Revisions, Questions, and Fast Replacements
Mistakes can happen, even on well-run projects. What matters is how we respond.
If a piece is off, we work to get you a clear revised print and a replacement quickly. You shouldn’t have to chase us.
A Team That Stands Behind the Building
We don’t disappear after delivery. If an inspector or insurer has questions months later, we’re still here to help.
That support is part of what you’re buying.
What That Feels Like
Here’s the real benefit. It’s confidence on delivery day. It’s no pit in your stomach during the first big storm.
And it’s a building you can hand down someday.
A Quick Scenario
Picture a farmer building a new equipment barn. Before delivery, he sits down with his supplier and walks through the print, bay by bay.
When the crates arrive, he checks every brace against his checklist. Each one is there, labeled, and matches the print. During erection, he photographs each brace as it goes in.
Months later, a heavy windstorm rolls through. He sleeps fine. The barn doesn’t move.
Learn More
Want to see how this works in practice? Explore these resources:
Frequently Asked Questions
Conclusion
The print is the promise. Verifying it takes some patience and a good checklist.
You don’t need to be an engineer. You just need to compare what’s on the page to what’s on your site. Do it at delivery, during erection, and again at the final walk-through.
Catch a problem early, and it’s a quick fix. Catch it late, and it gets expensive.
Our goal is a building you never have to worry about, whatever the weather does.
If you’d like help reading your print, or want to see what a clearly engineered, fully braced building looks like, reach out to our team at Metal Pro Building. We’ll have a no-pressure conversation and walk through it with you.